Tutorial: Animation Basics
In the last tutorial I showed how to make drawings with really fast techniques. I don’t know of anyone who uses that technique, even though it saves a ton of time. So, we are going to try this new technique in animation. You need the same programs as last time, GIMP and a Vector program like Inkscape or Illustrator.
First we need to make a quick drawing.

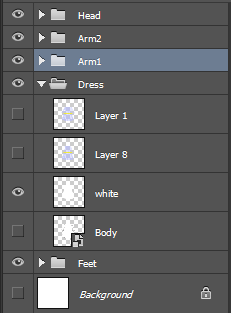
I made this for picture book I am working on. Her name is Eliza. Take the picture apart, and put it into separate folders.
If you copy pasted this from illustrator, you will also need to make a layer specifically for a white background. This way, the dress or skin won’t be see through.
Place folders to contain each moveable part of the body. Then put your colors, and tracings in that. A mistake I made was to post the feet together. This meant her feet couldn’t move. Another spot to be careful of is the head. I placed her face in a folder within a folder.
BTW, I need to work on the face even after this tutorial. If you don’t like the eyes, you can change them. That’s the joy, the outline was a suggestion, not the end result.
I worked on the hair a bit because it has an important part of the story.
Color the picture as you want.
There, a quick colored character. She needs to move though. If you noticed, the outline had the arms as part of the dress, but i want to move them. Not to worry, grab the lasso tool.
And surround one of the arms.
Press CTRL + X, and make a new layer in Arm1. Then press CTRL + V to past in the picture. Do this with the white, and the colors. Make sure the white is below the colors.
So now the arm is separate from the dress.
Make your cursor into the black arrow, and then press the Arm 1 Folder. 
This makes everything in the folder moveable at the same time.
Spin the arm into a new position.
Then move it back to the shoulder properly.
There, it has been moved. I did the other arm, and changed the face a little to make a jump. I hate those fingers. So I made another layer with new fingers
If you are having problems moving the arms correctly, imagine this.
These lines are the basic idea of the skeleton and how it moves. It works in 2D and 3D just as easily. In fact, more advanced programs add these lines for you, and move things without you having to do anything else. In 3D, they film people wearing special suits, and then line up the suits with the lines in 3D. Characters like Gollum in Lord of the Rings, or The Hulk in The Avengers have actors playing the characters, but a computer turns them into the other. In fact, this technique is so common these days it is hard to tell what is CG and what isn’t usually.
This tutorial showed how to make a character for animating. Then we made a simple animation to show how to do it. With the basics taught, you can expand the idea, and make multiple step animations with several characters. Try it, and show me the results.
Comments